Tallyfy’s REST API gives developers full programmatic access to the same platform features that…
API integration guide
Tallyfy’s REST API lets you connect workflow features to your own applications and systems.
The Tallyfy API uses different names than what you’ll see in the web app. Here’s the mapping:
- API
Checklists= Templates in the UI (containing Steps) - API
Runs= Processes in the UI (containing Tasks) - API
Captures= Task form fields in the UI - API
Preruns= Kick-off form fields in the UI
Keep these distinctions in mind when reading the API docs - they’ll help you match API data to what users actually see in Tallyfy.
Every API call must include these headers:
Authorization: Bearer YOUR_ACCESS_TOKENX-Tallyfy-Client: APIClientAccept: application/jsonImportant: Tallyfy rejects requests without the X-Tallyfy-Client header.
Tallyfy supports two authentication approaches:
For integrations acting on behalf of a specific Tallyfy user:
- Go to Settings > Integrations > REST API in your Tallyfy account
- Copy your personal access_token
- Include this token in the
Authorizationheader of your API requests
This video shows how to get your access token:
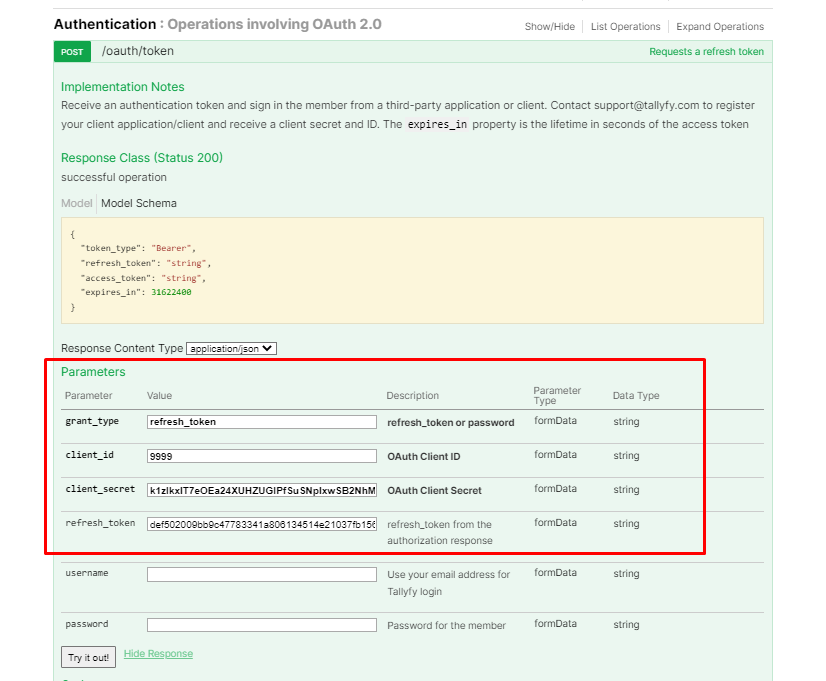
For third-party apps needing client credentials:
- Contact Tallyfy Support describing your integration needs
- You’ll receive a Client ID and Client Secret
- Implement the OAuth 2.0 flow to get and refresh access tokens
This diagram shows the full OAuth flow for both authentication methods.

What to notice:
- Steps 1-4 show initial authentication - use password grant for user context or client credentials for app-only access
- Step 5 shows required headers for all API requests - both
AuthorizationandX-Tallyfy-Clientheaders are mandatory - Steps 6-10 show token refresh when a 401 error occurs - your app should handle this retry automatically
Personal access tokens are invalidated when users log out. To reduce disruption:
- Automated systems: Use application tokens (Enterprise plans) instead of personal tokens when possible
- User-based integrations:
- Let users know that logging out breaks automations
- Add error handling to detect invalidated tokens
- Provide clear steps for getting new tokens after logout
- Monitoring: Log authentication failures to spot patterns early
- Store tokens with encryption at rest
- Never expose tokens in client-side code or logs
- Rotate tokens regularly for sensitive operations
- Handle token expiration by refreshing automatically
Tallyfy users can belong to multiple organizations1. This matters for API integrations:
- A user’s access token is tied to their current organization
- API requests operate within that organization’s context
- Organization IDs are required in most API endpoint URLs (e.g.,
/organizations/{org_id}/checklists)
When building integrations:
- Collect the organization ID during setup
- Store it alongside user credentials in your app
- Include it in your API request URLs
For users belonging to more than one organization:
- Let users pick which organization to work with
- Store multiple organization IDs if your app spans organizations
- Permissions and data differ between organizations
- You may need updated tokens when switching organizations
Getting 401 “Unauthenticated” errors despite having valid client credentials? You likely need the password grant flow.
- Make a POST request to the OAuth token endpoint:
POST https://go.tallyfy.com/api/oauth/tokenContent-Type: application/x-www-form-urlencoded
grant_type=password&client_id=YOUR_CLIENT_ID&client_secret=YOUR_CLIENT_SECRET&username=YOUR_EMAIL&password=YOUR_PASSWORD- You’ll get a response with an access token:
{ "token_type": "Bearer", "expires_in": 3600, "access_token": "eyJhbGci...", "refresh_token": "def50200..."}- Use this token in the
Authorizationheader:
Authorization: Bearer YOUR_ACCESS_TOKEN| Grant type | Purpose | Access context | Best for |
|---|---|---|---|
| client_credentials | App-to-app authentication | Application context only | Backend services, system integrations |
| password | User-based access via application | Full user context | Endpoints requiring user permissions |
Key distinction: Most Tallyfy API endpoints require user context, so password grant is usually what you need. If you’re getting 401 errors with a client_credentials token, switch to password grant.
Access tokens expire after 1 hour and need refreshing:
- Store both the access_token and refresh_token when first obtained
- When the access token expires, POST to the token endpoint with your refresh token
- You’ll receive a new access token (and sometimes a new refresh token)
This video shows the token refresh process:
-
Token format: Make sure your Authorization header is exactly:
Authorization: Bearer YOUR_ACCESS_TOKENThere must be exactly one space between “Bearer” and your token.
-
Token expiration: Tokens expire after 1 hour. Refresh or request a new one.
-
Invalid credentials: Double-check your client ID, client secret, username, and password.
-
Missing headers: Every request needs the
X-Tallyfy-Client: APIClientheader. -
Wrong token endpoint: Confirm you’re hitting
https://go.tallyfy.com/api/oauth/tokenwith the correctgrant_type. -
Logout invalidation: Personal tokens are immediately invalidated on logout. If your automation stops working, check whether the user logged out.
If problems persist, check the response body for specific error messages or contact Tallyfy Support with your full error response.
For cross-origin challenges:
- Watch for CORS preflight (
OPTIONS) requests - Check response headers for CORS permissions
- Verify allowed origins and methods
When working with dates in the Tallyfy API:
| Direction | Format | Example |
|---|---|---|
| Request (to API) | YYYY-MM-DD HH:MM:SS | 2025-05-15 14:30:00 |
| Response (from API) | ISO 8601 (Zulu time) | 2025-05-15T14:30:00.000Z |
Make sure your code handles both formats correctly.
For event-driven integrations, Tallyfy offers webhooks that don’t require polling the API:
- Configure webhooks at the process or step level
- Get real-time notifications when specific events happen
- Process the webhook payload to trigger actions in your systems
For setup details, see the webhooks setup guide.
Code Samples > Authentication methods
Tallyfy API authentication uses either a personal access token (lasting 6 months from Settings)…
Open Api > Third-party application API access
Third-party apps can access Tallyfy’s API through OAuth 2.0 client credentials. Your app gets an…
Api Clients > Getting started with Postman API testing
Test Tallyfy’s REST API in Postman without writing code. Authenticate with the password grant…
-
Organizations in Tallyfy are isolated tenants - each with its own templates, processes, members, and settings ↩
Was this helpful?
About Tallyfy
- 2025 Tallyfy, Inc.
- Privacy Policy
- Terms of Use
- Report Issue
- Trademarks