Workflow process mapping that actually works
Workflow process mapping turns invisible work into something you can see and fix. Small cross-functional teams of 7 to 10 people, using tools like Draw.io or Tallyfy, uncover bottlenecks that management never knew existed.
Process mapping turns the invisible mess of how work gets done into something you can see, question, and fix.
Tallyfy is the only product available that does Process Documentation and Process Tracking in one
Summary
- Start with processes that hurt the most - List everything your company does, rank by business impact, then rank by how badly it’s performing. The high-impact, low-performance ones go first because that’s where you’ll see real returns from mapping
- Small, cross-functional teams beat big committees - Gather 7-10 people from different departments. They’ll give you accurate information without slowing things down, and they’ll champion the changes later when you roll them out
- Static flowcharts aren’t enough anymore - Pen and paper dies in a drawer. Diagramming tools like Draw.io create shareable visuals. But workflow software like Tallyfy goes further by actually executing and tracking the process you’ve mapped
- The real value is seeing what’s really happening - Interview the people who do the work every day. You’ll uncover workarounds, bottlenecks, and redundancies that nobody in management knew existed
Every organization runs on business processes. Some are documented. Most aren’t. And the gap between “how we think work gets done” and “how it actually gets done” is where money, time, and sanity go to disappear.
That’s what workflow process mapping fixes. You’re creating visual “process maps” of your workflows - usually through flowcharts or digital workflows - so you can finally see the thing you’ve been guessing about.
Why bother? A few reasons that matter:
- Employee onboarding - Process maps double as Standard Operating Procedures (SOPs) for bringing new people up to speed fast.
- Process standardization - Figure out the best way to run a process, then make sure everyone does it that way. No more “well, I do it differently.”
- Process improvement - You can’t fix what you can’t see. Maps give you a top-down view of where things break, pile up, or waste effort.
Here’s something that keeps coming up in our conversations at Tallyfy: onboarding alone shows up in hundreds of workflow discussions we’ve had with teams. Everyone knows it’s broken. Few people have mapped it. And workflow process mapping isn’t simple - it pulls in employees across every level of the organization, sometimes outside consultants too.
At Tallyfy, we’ve got internal process experts who help us map, improve, and optimize workflow processes every day. Here’s how we approach it.
Pick the right tool before you start
Before you touch a single process, you need to decide how you’re going to map it. There are three options, and they’re not created equal.
1. Pen and paper - The most straightforward option is drawing the process flowchart on paper.
It’s easy. It’s also nearly useless for anything beyond a quick brainstorm. You can’t share it efficiently. You can’t edit it without starting over. It sits in a notebook and dies there.
2. Diagramming software - Tools like Draw.io or LucidChart let you create flowcharts online.
You can store the workflow diagrams in the tool or export them. Better than paper. But here’s the catch - a diagram just sits there. It doesn’t do anything.
3. Workflow software - Workflow management software is diagramming on steroids.
You won’t create traditional flowcharts. Instead, you’ll create digital workflows where you input the process and the software ensures it actually gets executed. It tracks who’s doing what, sends reminders, and catches things when they fall through the cracks.
An agent without a defined process is a search engine with delusions of usefulness. Right now, nobody’s building the workflows those agents need to follow. That’s the gap. A process map in a diagramming tool can’t talk to an AI agent. A process running inside workflow software? That’s infrastructure AI can work with.
Pick the process that matters most
Once you’ve picked your tool, which process do you map first? You can’t do everything at once.
Our rule of thumb is simple. First, list out all company processes. Then sort them by importance - which process has the biggest impact on your products or services? Next, sort by performance within each importance tier.
The ones performing worst go to the top. So you end up with a clear starting point: critical company processes that are also underperforming.
These are the ones you want mapped yesterday. Start there.
Bring the right people into the room
You probably don’t know everything about the workflow you’re mapping. I certainly don’t know everything about ours, and I built the company.
To get the picture right, gather a team of 7-10 employees. You want relevant departments represented - the people who actually touch the process, senior management who understands the business context, and maybe a process expert if you’ve got one.
Why 7-10? Fewer than that and you’ll miss important steps. More than 20 and the whole initiative slows to a crawl.
The input from frontline employees is probably the most valuable part of this exercise. They know the workarounds. They know where things get stuck. What surprised us when we dug into the data with property management companies, we learned their onboarding processes often span 5+ distinct channels and involve coordination between sales, operations, and multiple external platforms. One team discovered their process had 12 separate validation checkpoints they’d never formally documented.
Here’s another thing to think about. If you end up making major changes to the process, some employees might feel threatened. “Maybe my job becomes irrelevant?” Your mapping team can carry the right message - that changes are good for both the organization and the people in it.
Gather the real information
Most employees carry out the process with some variation. That’s normal. But you need to figure out which approach works best and document that one.
Interview the employees who work on the process first-hand. Ask them how they do it. Ask them where it breaks. Ask them what they’d change if they could.
Based on hundreds of implementations, we’ve observed that the biggest breakthroughs come when frontline staff reveal workarounds nobody in management knew existed. A healthcare group we worked with discovered their member onboarding had three separate approval cycles that could be consolidated into one with better upfront data collection.
At this stage, nail down these specifics:
- Who owns each step?
- What’s the exact sequence of tasks?
- What’s the deadline for each step?
You could also determine process input, output, and duration. This helps benchmark things if you’re planning improvements later.
Create the map
Now you’ve got the information. Time to build the thing. How you do this depends on whether you chose diagramming software or workflow software.
Using diagramming software
Pick your tool - for this example, we’ll use LucidChart.
Create an account. Pick the flowchart template.
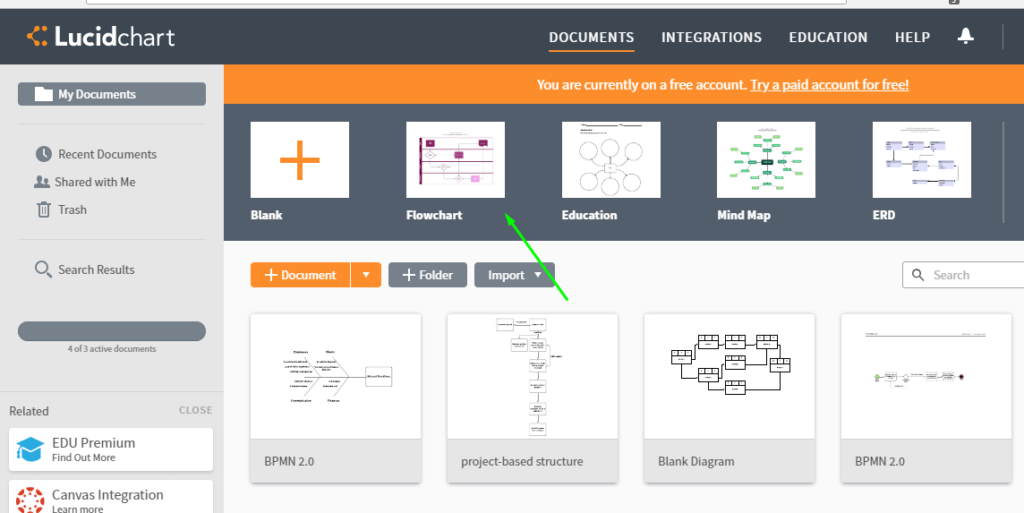
Name your workflow and create a block for each step.
Here’s a workflow process map for a support process:
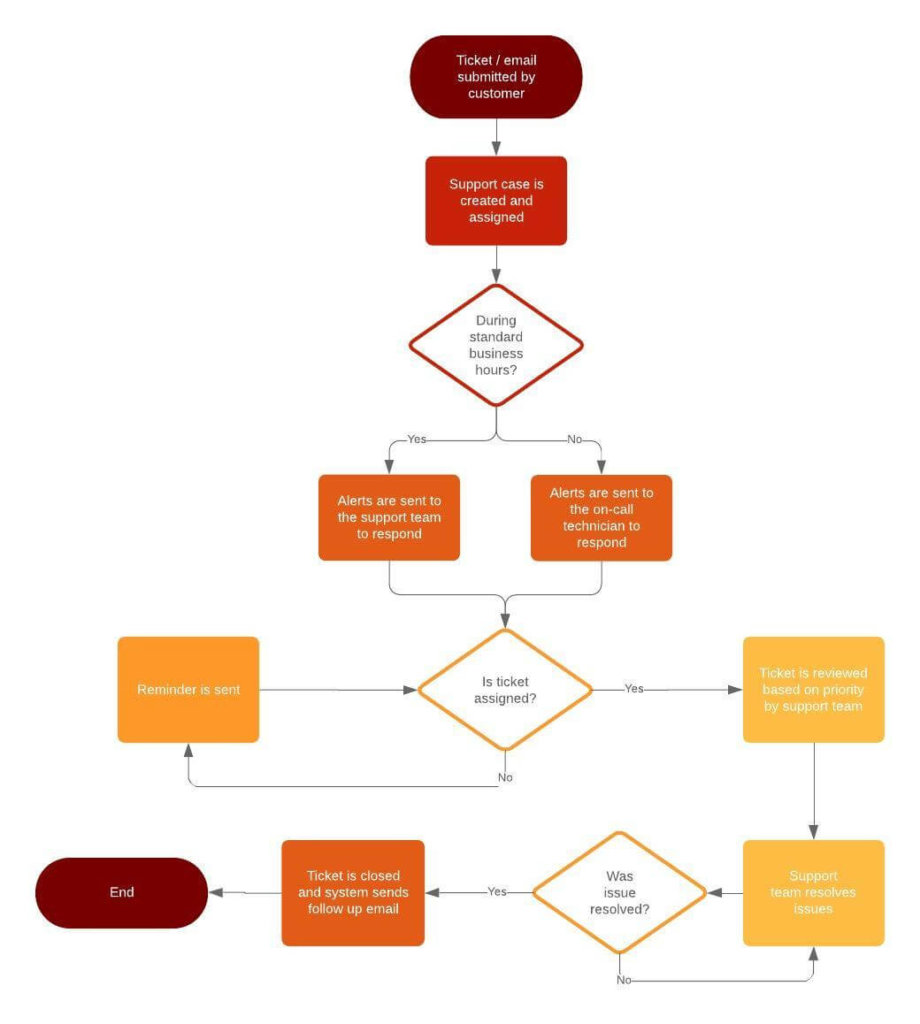
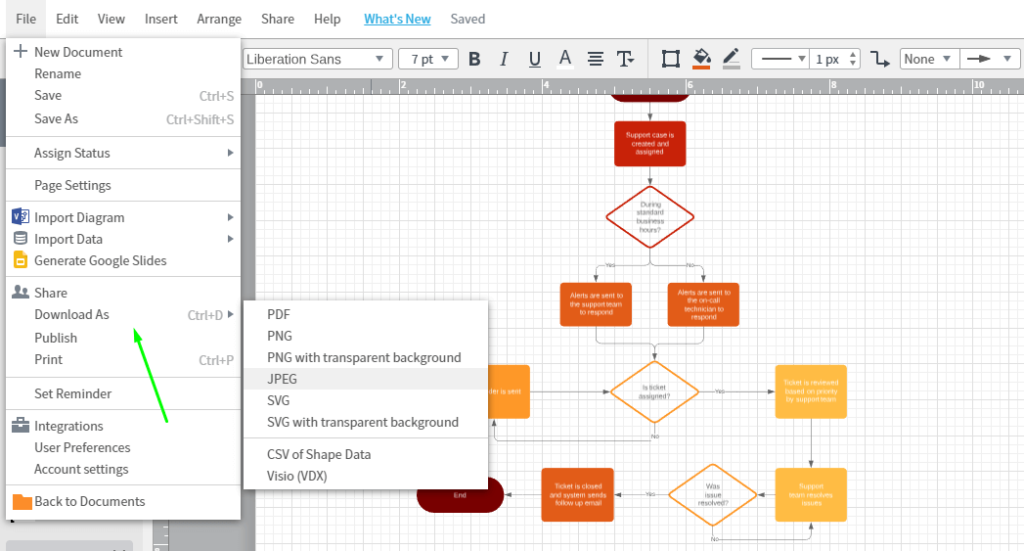
Connect the blocks based on task sequence, leading to the final step. Save and export as PDF or whatever format you need.
Using workflow software
This takes a bit more effort upfront, but the payoff is worth it:
- Workflow automation - The software assigns tasks to the right people automatically. Once you set up the workflow, it runs itself.
- Real efficiency gains - A centralized place to manage workflows means fewer missed deadlines, fewer bottlenecks, fewer “I didn’t know I was supposed to do that” moments.
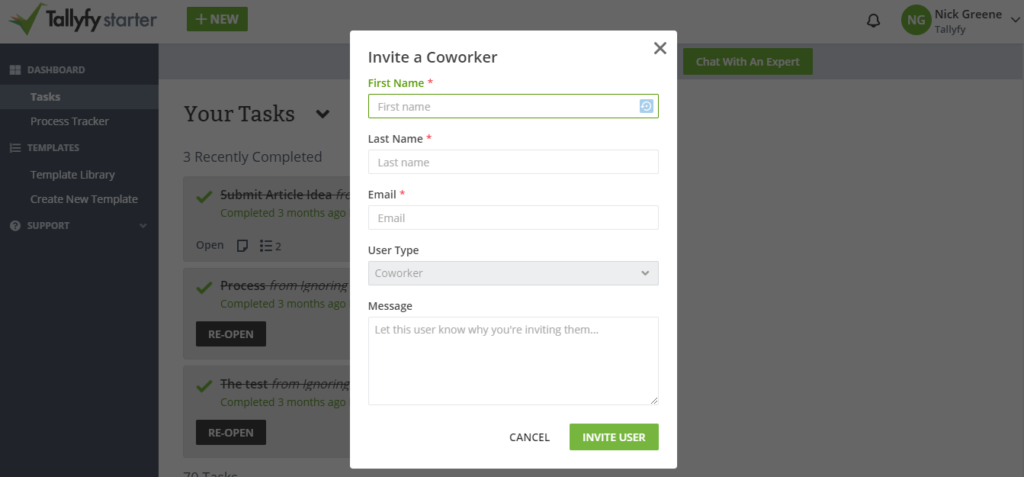
If you want to try Tallyfy (it’s free), head here and register. Get your team on board first - hit “new” then “invite co-worker.”
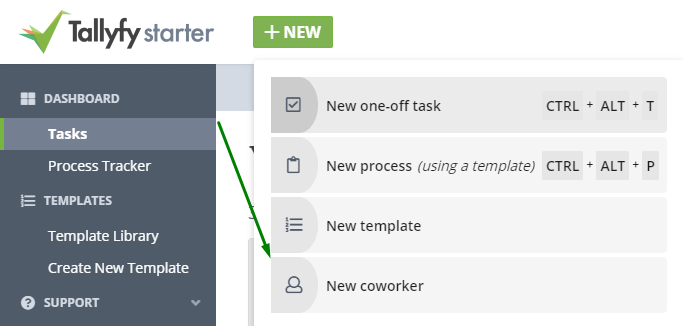
Fill in the form and repeat for everyone who needs access.
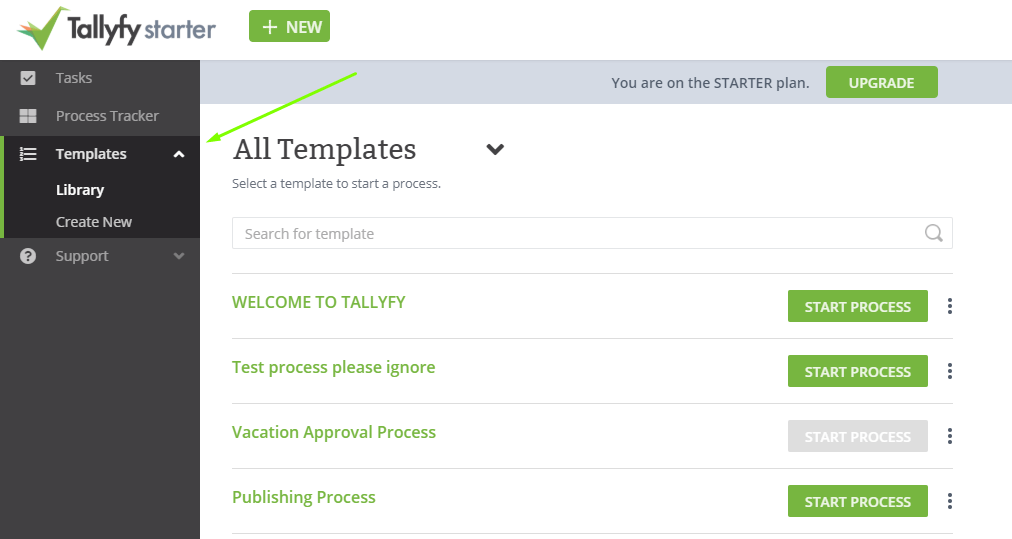
Then head to the “templates” section and click “create new.”
Name your workflow (say, employee onboarding) and fill in the steps.
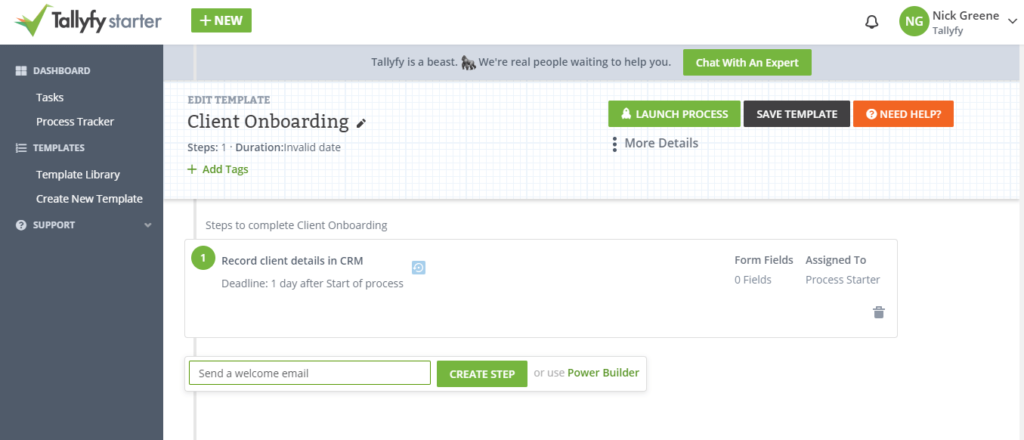
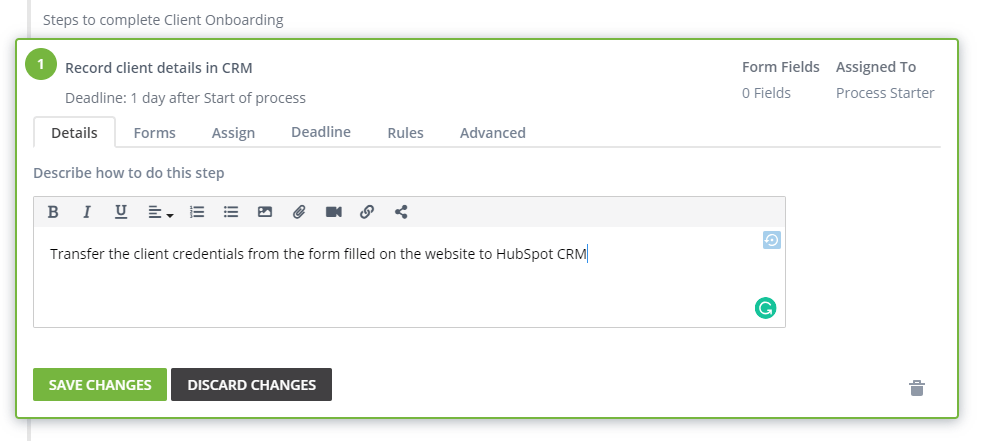
Set up instructions, deadlines, and whatever else each step needs.
Launch it from the template library and the system takes over. Done.
Want to learn more about different types of workflow management systems? We’ve got a guide for that.
Mapping is just the beginning
Are you hearing this at work? That's busywork
Enter between 1 and 150,000
Enter between 0.5 and 40
Enter between $10 and $1,000
Based on $30/hr x 4 hrs/wk
Your loss and waste is:
every week
What you are losing
Cash burned on busywork
per week in wasted wages
What you could have gained
160 extra hours could create:
per week in real and compounding value
Total cumulative impact over time (real cost + missed opportunities)
You are bleeding cash, annoying every employee and killing dreams.
It's a no brainer - improve your workflows
Here’s where most people stop. They’ve got their map. They feel accomplished. But the map isn’t the point - it’s the starting line. The whole reason you mapped the process was to improve it, and improvement means looking at your map with fresh eyes. Where are steps redundant? Where do things get stuck? Where are people doing manual work that software could handle? Which handoffs consistently cause delays because nobody knows who’s supposed to act next? Which approval steps exist purely because they existed five years ago when a different person ran the department? Which pieces of information get re-entered into three different systems because nobody built a proper integration? These are the questions the map should help you answer - and if you file the map away without asking them, you’ve done the hard work for nothing.
So if your mapped process has broken steps, automating those steps just breaks things faster at higher volume. Fix the process first, then automate.
A few resources to keep going:
- Process mapping tools - Other tools you can use for mapping, beyond what we’ve covered here.
- Process improvement tools - If you’re not sure how to come up with and implement improvements, these tools will help.
Common questions about process mapping
What is workflow process mapping?
Think of it as drawing a detailed road map of how work actually gets done. It’s a visual representation of every step, decision, and handoff in a task - from something simple like processing an invoice to something complex like onboarding a new hire. You’re taking the messy reality of how work flows and turning it into something you can see, share, and improve.
What’s the difference between a workflow and a map?
The workflow is the actual work - a document passing through different reviewers, a ticket moving through a support queue. Mapping is the act of recording that route. Your morning commute is a workflow. Drawing the directions for someone else? That’s the map. One exists whether you document it or not. The other makes it visible.
Why does process mapping matter?
It’s like turning the lights on in a room that’s been dark. Suddenly you can see where work piles up, where steps are unnecessary, where friction lives. Without a map, you’re guessing. With one, you’re making decisions based on what’s actually happening. That clarity helps teams work smarter and catch problems before they grow.
What are the basic elements of a process map?
Pretty simple, honestly. Rectangles are tasks. Diamonds are decisions. Arrows show flow direction. Circles mark the start and end. Each shape has a specific meaning, and once you know them, you can read any process map in about thirty seconds.
What are the most common mistakes?
Three big ones. First, making the map too complicated - trying to capture every exception and edge case until nobody can follow it. Second, forgetting decision points where the process branches. Third, and this is the killer, mapping the process as you wish it worked instead of how it really works. Be honest with the map or don’t bother.
How detailed should the map be?
Think subway map, not street map. You don’t need every building and every alley. You need enough detail that someone can follow the process from start to finish without getting lost. The right level of detail depends on who’s using the map and what they need it for. A training map for new employees needs more detail than an executive overview.
How does process mapping connect to automation?
Mapping shows you which parts of a process are repetitive, rule-based, and ripe for automation. It’s like getting an X-ray of your workflow - you can see exactly which steps could be handled by software instead of people. Map first, then automate the right things. Skip the mapping and you’ll automate the wrong things. I’ve seen it happen more times than I can count.
About the Author
Amit is the CEO of Tallyfy. He is a workflow expert and specializes in process automation and the next generation of business process management in the post-flowchart age. He has decades of consulting experience in task and workflow automation, continuous improvement (all the flavors) and AI-driven workflows for small and large companies. Amit did a Computer Science degree at the University of Bath and moved from the UK to St. Louis, MO in 2014. He loves watching American robins and their nesting behaviors!
Follow Amit on his website, LinkedIn, Facebook, Reddit, X (Twitter) or YouTube.

Automate your workflows with Tallyfy
Stop chasing status updates. Track and automate your processes in one place.