A Slack bot listens for slash commands from users, hits an external API, and posts the results back into a channel. That’s basically the whole thing. Events API receives the trigger, your PHP script processes it, Web API sends the response. You can wire up any data source you want in about an hour.
Summary
- Events API and Web API work like ping-pong: Events API pings your app when something happens in a Slack channel, Web API pongs commands back when your app wants to post a message. Two directions, same game
- Slash commands trigger your integrations: Create commands like “/todo” or “/temperature” that listen for user input, hit external APIs, and return formatted responses directly in Slack channels
- PHP and cURL handle the whole request cycle: Use curl_init() to start, curl_setopt() to configure headers and endpoints, curl_exec() to run, curl_close() to finish. Then json_decode() turns the response into something useful
- Webhook URLs let you post back to Slack: After processing external API data, reinitialize cURL to POST formatted JSON with attachments and markdown to your Slack webhook. That’s what displays the message in the channel. Explore workflow automation
One thing that keeps coming up with workflow automation, integration topics come up constantly, and Slack integration is one of the most requested capabilities. Slack has become the default communication platform for a huge number of teams, and its API opens the door to building some useful automations.
Workflow Made Easy
Why does this matter? Because most teams are drowning in context-switching between apps. A well-built Slack bot can pull information from wherever it lives and drop it right into the conversation. No tab-switching, no copy-pasting, no mess.
One of the most useful applications of the Slack API is building bots. Slack calls them “virtual team members” that help you manage tasks. In this tutorial, we’ll:
- Break down the Slack API
- Understand how Slack bots work
- Build a bot that pulls real task data (and a fun one that generates random useless facts)
Here’s the end result:
Let’s get into it.
How the Slack API works
I’m assuming you already know Slack as a platform. If not, it’s a team communication tool Stewart Butterfield built for business, similar to Discord. With so many businesses running on Slack, a complete API was inevitable.
Slack’s platform has several APIs for building “apps”: the Real Time Messaging API (now legacy), the Events API, the Web API, and the Conversations API. This tutorial uses the Events API and the Web API. The Events API is the one that notifies your app when something happens in Slack: a message posted, a reaction added, a slash command triggered. The Web API is what your app uses to talk back: posting messages, updating channels, uploading files.
Turns out, you’ll bounce between these two constantly when building bots. Most developers start with the Events API because it’s the trigger for everything, then realize they need the Web API to actually do anything useful with that trigger. Here’s how they relate.
The Events API and Web API relationship
Building a Slack app generally requires both the Events API and the Web API. They do similar things but in opposite directions. Which trips people up at first.
Think of it as ping-pong. When an “event” happens in a Slack channel, the Events API pings information about that event to your app. When your app processes that information and wants to make a change back in Slack, it uses the Web API to pong commands back.
Both APIs are notifiers and observers. They just point in different directions.
 Your app is basically a fancy game of ping-pong.
What Slack bots can do
Bots are one type of Slack app that can make your channels useful. They listen for commands from users and return relevant information. You could build a bot that responds with the current weather when someone types “/temperature” or pulls your company’s quarterly sales figures when someone types “/revenue.” Pretty much any data you can get from an API, you can pipe into a Slack bot command.
This is where it gets interesting. Process quality is performance. But a well-structured bot that surfaces the right data at the right time? That’s the kind of small automation that compounds.
In this example, we’re building a Slack bot that listens for the “/todo” command and returns the user’s pending tasks from the Tallyfy API. Tallyfy manages workflows and tasks, so it’s a natural fit. This demo shows how to connect an external data source to Slack.
Building the bot step by step
Required knowledge:
- PHP
- cURL
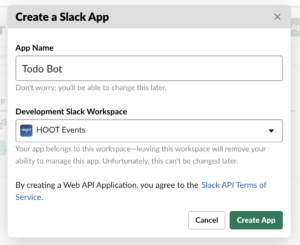
Step 1 - Create the app in Slack
First, create an app within Slack. Click this link, name your app, and pick a workspace.
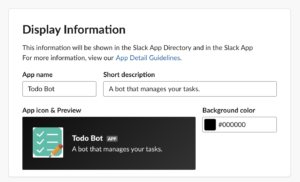
Then give it a description, image, and background color.
Step 2 - Create your request URL
Now you need somewhere to host the app on your end. This means creating a PHP file that listens for events from the Events API, processes them, and sends commands back to Slack.
I’m naming the file “todoBot.php” and hosting it on my own site.
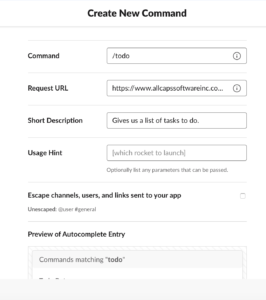
Step 3 - Set up the slash command
Go to the “Slash Commands” tab and click “Create New Command.” You’ll get a form to configure your command.
Make sure the “Request URL” field points to where you’re hosting the PHP file. Fill it out like this and hit save.
Done. Everything is set up on Slack’s side.
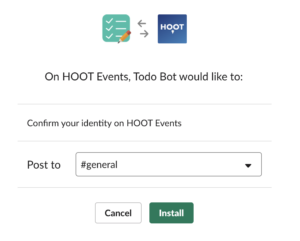
Step 4 - Activate incoming webhooks
This step points your app at the right channel. Go to the “Incoming Webhooks” tab and flip the switch from “Off” to “On.”
Choose the channel you want the app to post to.
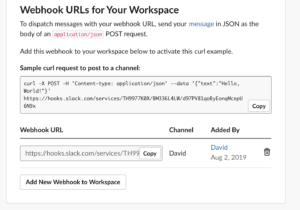
Scroll down and you’ll see a “Webhook URL.” Save this. You’ll need it later.
Step 5 - Make the API request
Now we need to pull data from an external API. I’m using the Tallyfy API here, but you could swap in any API that returns data you want to surface in Slack.
We’ll use cURL in PHP. This is probably the most painful part, but cURL shows up everywhere in API work, so it’s worth understanding.
Inside our conditional statement, we initialize cURL, tell it where to pull data from, set the authentication headers, execute, and close. The request returns a JSON of our organization’s outstanding tasks.
//Initiate cURL
$curl = curl_init();

//Will return the response, if false it prints the response
curl_setopt($curl, CURLOPT_RETURNTRANSFER, true);

//Set the url, in this case Tallyfy's organization tasks endpoint
curl_setopt($curl, CURLOPT_URL, 'https://api.tallyfy.com/organizations/{ My Tallyfy organization id }/tasks');

//Set the header of our Tallyfy API request to our authenticating information
curl_setopt($curl, CURLOPT_HTTPHEADER, array(
    'accept: application/json',
    'content-type: application/json',
    'authorization: Bearer { My Tallyfy authorization token }',
    'X-Tallyfy-Client: SlackBot Demo'
));

//Execute cURL
$result = curl_exec($curl);

//Close the cURL
curl_close($curl);
Step 6 - Process the API response
Now we need to take the tasks returned by our API request and format them so Slack can display them. We’ll convert tasks into an array of Slack attachments and package them into a cURL body. The JSON structure looks like this:
{
  "mkdwn" : true,
  "text" : "*Tasks to do:*",
  "attachments":
  [
    {
      "color" : "#3DB75C",
      "text" : "This is a task!"
    },{
      "color" : "#3DB75C",
      "text" : "This is also a task!"
    }
  ]
}
First, turn the API result into an array object.
...
// Execute cURL
$result = curl_exec($curl);

//Close the cURL
curl_close($curl);

//Decode our cURL result into an array
$json = json_decode($result, true);
Grab the value for the “data” key.
...
// Execute cURL
$result = curl_exec($curl);

//Close the cURL
curl_close($curl);

//Decode our cURL result into an array
$json = json_decode($result, true);

//Get the Tallyfy data from the JSON array
$data = $json['data'];
Create an empty “attachments” array and loop through each task, adding it as an attachment.
...
// Execute cURL
$result = curl_exec($curl);

//Close the cURL
curl_close($curl);

//Decode our cURL result into an array
$json = json_decode($result, true);

//Get the Tallyfy data from the JSON array
$data = $json['data'];

$attachments = array();
foreach ($data as $task) {
    $task_name = $task['title'];
    array_push($attachments, array(
            'color' => '#3DB75C',
            'text' => $task_name
        )
    );
}
Now use the attachments array to build the cURL body for Slack.
...
// Execute cURL
$result = curl_exec($curl);

//Close the cURL
curl_close($curl);

//Decode our cURL result into an array
$json = json_decode($result, true);

//Get the Tallyfy data from the JSON array
$data = $json['data'];

$attachments = array();
foreach ($data as $task) {
    $task_name = $task['title'];
    array_push($attachments, array(
            'color' => '#3DB75C',
            'text' => $task_name
        )
    );
}

//Create an HTTP body to pass in our Slack POST
$slack_body = array(

//Setting mkdwn to true allows us to bold substrings by encasing them in asterisks
    'mkdwn' => true,
    'text' => "*Tasks to do:*",
    'attachments' => $attachments
);
Ready to send it back.
Step 7 - Post the results to Slack
Now we send the formatted attachments back to Slack. Same pattern: cURL, but this time as a POST to your webhook URL.
...
//Now we have everything we need to post our HTTP body to slack and print a new message
//Reinitialize our cURL
$curl = curl_init();

//Set the cURL to the appropriate webhook (the one we saved earlier in Step 4: "Activate Incoming Webhooks") url for your app and set the cURL to a POST request
curl_setopt($curl, CURLOPT_URL, 'https://hooks.slack.com/services/{ Your slack webhook }');
curl_setopt($curl, CURLOPT_POST, 1);

//Set the cURL's body to a JSON encoding of our slack_body
curl_setopt($curl, CURLOPT_POSTFIELDS, json_encode($slack_body));

//Receive server response ...
curl_setopt($curl, CURLOPT_RETURNTRANSFER, true);

//Execute and close our cURL
curl_exec($curl);

curl_close($curl);
}
?>
When you’re done, the complete PHP file should look something like this:
<?php
//Initiate cURL
$curl = curl_init();

//Will return the response, if false it prints the response
curl_setopt($curl, CURLOPT_RETURNTRANSFER, true);

//Set the url, in this case Tallyfy's organization tasks endpoint
curl_setopt($curl, CURLOPT_URL, 'https://api.tallyfy.com/organizations/{ My Tallyfy organization id }/tasks');

//Set the header of our Tallyfy API request to our authenticating information
curl_setopt($curl, CURLOPT_HTTPHEADER, array(
    'accept: application/json',
    'content-type: application/json',
    'authorization: Bearer { My Tallyfy authorization token }',
    'X-Tallyfy-Client: SlackBot Demo'
));

// Execute cURL
$result = curl_exec($curl);

//Close the cURL
curl_close($curl);

//Decode our cURL result into an array
$json = json_decode($result, true);

//Get the fact, as a string, from the JSON array
$data = $json['data'];

$attachments = array();
foreach ($data as $task) {
    $task_name = $task['title'];
    array_push($attachments, array(
            'color' => '#3DB75C',
            'text' => $task_name
        )
    );
}

//Create an HTTP body to be passed in our Slack POST
$slack_body = array(

//Setting mkdwn to true allows us to bold substrings by encasing them in asterisks
    'mkdwn' => true,
    'text' => "*Tasks to do:*",
    'attachments' => $attachments
);

//Now we have everything we need to post our HTTP body to slack and print a new message
//Reinitialize our cURL
$curl = curl_init();

//Set the cURL to the appropriate webhook (the one we saved earlier in Step 4: "Activate Incoming Webhooks") url for your app and set the cURL to a POST request
curl_setopt($curl, CURLOPT_URL, 'https://hooks.slack.com/services/{ Your slack webhook }');
curl_setopt($curl, CURLOPT_POST, 1);

//Set the cURL's body to a JSON encoding of our slack_body
curl_setopt($curl, CURLOPT_POSTFIELDS, json_encode($slack_body));

// Receive server response ...
curl_setopt($curl, CURLOPT_RETURNTRANSFER, true);

//Execute and close our cURL
curl_exec($curl);

curl_close($curl);
?>
We’re almost there. One more step.
Step 8 - Reinstall the bot
No matter what order you do the above steps in, you’ll probably need to uninstall and reinstall the Slack bot from your channel. If you skip this, the channel won’t recognize the slash command.
Go to the channel where you originally installed the bot. You’ll see a message like “added an integration to this channel: Todo Bot.” Click the bot name, choose “Settings,” then “Remove App.” Reinstall the app to the channel.
Note: Every time you install an app to a new channel, the webhook URL changes. That includes uninstalling and reinstalling. Update your PHP file with the new webhook from step 7.
Once you reinstall, type “/todo” and you should see your Tallyfy tasks.
Adapting this for any API
I used the Tallyfy API because it’s what I know best. It handles workflow automation and task management, so pulling task data made sense for a demo. But this same code pattern works with any API.
We built Tallyfy because we kept seeing with teams running complex onboarding workflows, we’ve heard that API availability, webhooks, and real-time processing are the factors that make or break their tool choices. One team running 50-step rollout processes told us that integrating their existing systems via webhooks reshaped how they track work in real time.
Here’s the thing that frustrates me about most integration setups. Nobody’s building the workflows that AI agents need to follow. A Slack bot is a small example of the bigger pattern: you need a structured process feeding structured data, or the automation is just noise.
To prove the code pattern is flexible, here’s a slightly altered version that relays random useless facts instead of tasks.
<?php
//Initiate cURL
$curl = curl_init();

// Will return the response, if false it prints the response
curl_setopt($curl, CURLOPT_RETURNTRANSFER, true);

// Set the url, in this case the random fact generator response as JSON
curl_setopt($curl, CURLOPT_URL, 'https://uselessfacts.jsph.pl/random.json?language=en');

// Execute cURL
$result = curl_exec($curl);

//Close the cURL
curl_close($curl);

//Decode our cURL result into an array
$json = json_decode($result, true);

//Get the fact, as a string, from the JSON array
$fact_text = $json['text'];

//Create an HTTP body to be passed in our Slack POST
$slack_body = array(

//Setting mkdwn to true allows us to bold substrings by encasing them in asterisks
    'mkdwn' => true,
    'text' => '*Random fact:*',
    'attachments' => array(
        array(

//You can change the attachment color to whatever you would like
            'color' => '#3DB75C',
            'text' => $fact_text
        )
    )
);

//Now we have everything we need to post our HTTP body to slack and print a new message
//Reinitialize our cURL
$curl = curl_init();

//Set the cURL to the appropriate webhook (the one we saved earlier in Step 4: "Activate Incoming Webhooks") url for your app and set the cURL to a POST request
curl_setopt($curl, CURLOPT_URL, 'https://hooks.slack.com/services/{ Your slack webhook }');
curl_setopt($curl, CURLOPT_POST, 1);

//Set the cURL's body to a JSON encoding of our slack_body
curl_setopt($curl, CURLOPT_POSTFIELDS, json_encode($slack_body));

// Receive server response ...
curl_setopt($curl, CURLOPT_RETURNTRANSFER, true);

//Execute and close our cURL
curl_exec($curl);

curl_close($curl);
?>
The result:
Slack pricing
- 90-day message history
- 10 app integrations
- Core AI included
- Minimum 3 users
- Advanced AI features
- 99.9% uptime SLA
Tallyfy Slack app
We built the bot in this tutorial using Tallyfy’s API, but there’s a dedicated Slack app for Tallyfy that does much more out of the box. If you’re looking to wire up task management to Slack without writing code, that’s the easier path.
Does every team need a custom bot? No. We’ve observed that operations teams don’t want to cobble together custom bots. They want things to just work. The Tallyfy Slack app surfaces task notifications, lets people complete workflow steps without leaving Slack, and keeps everything tracked. No PHP required.
If you want to try it, create a free Tallyfy account and connect the Slack app from the integrations page.
