The Essential Guide to Automating Content Publishing Workflow
Publishing workflows coordinate every action from content ideation to publication, preventing organizational chaos in editorial processes. This guide covers creating workflows using software tools, automating steps with notifications and deadlines, and managing content creation through editing, design, and final publishing.
Publishing workflows manage content from creation through approval.
Workflow Made Easy
Summary
- Chaos happens without defined workflows - Drafts arrive for articles you never requested, designers go on holiday with unfinished work, freelancers vanish mysteriously, and your blog sits stale for days while nobody knows who owns what
- Publishing workflows map every step from idea to publication - For solo bloggers, publishing means write and upload. For media companies, it coordinates researchers, writers, editors, designers, and publishers across multiple processes with clear handoffs
- Software automates coordination and accountability - Workflow tools send email notifications when tasks are ready, set deadlines for each step, centralize files and information, and integrate with team management software through Zapier
- Typical flow: Create, edit, design, compile, publish - Writer drafts content and specifies needed illustrations, editor reviews simultaneously with designer creating assets, writer incorporates edits and adds images, final step uploads to CMS with link verification. See how Tallyfy manages publishing workflows
Without a solid publishing workflow, your editorial processes might be a complete mess. I have seen this play out repeatedly with teams who thought they could wing it.
You start receiving drafts for articles you have never asked for.
Several guides have been on hold for days now - the designer forgot to fix up the images, and now he is on a holiday.
The two other scheduled posts are not in yet, and the freelancers that were supposed to write them disappeared under mysterious circumstances.
Your blog is getting extremely stale, as it has not seen a fresh piece of content for days.
If you create a publishing workflow, the organizational mess that is editing will be a thing of the past.
What is a publishing workflow?
A workflow is the combination of several different processes that are to be carried out to achieve some business goal.
A publishing workflow, accordingly, is every single action that needs to be taken carried out to get a piece of content from the ideation stage to your website.
Depending on the size of the company, publishing can either be extremely simple or complicated. If you’re a blogger, you just scrap together an article, upload it to Wordpress, and you’re gold.
If you’re a media company, though, it means you have different people in charge of different processes. You can have, for example, one person in charge of research, another for writing, and the third for editing - and that is not even the worst-case scenario.
A publishing workflow can help everyone involved in the process coordinate, making it easy to see which stage the content is in, and what more needs to be done.
How to create a publishing workflow?
The old-fashioned way to create workflows is pretty simple - using a pen and a paper. You graph out the exact steps that you would need to take to get from idea conception to publishing.
This tends to help with traditional businesses case: you get a clear idea on which workflows your business consists of, and how to make it better.
A publishing workflow, though, needs to be digital. You already know what the processes are - you just need an easy way to manage them.
And that is where workflow software, such as Tallyfy, comes in.
Publishing workflow software
Publishing workflow software allows you to map out your entire publishing schedule for each piece of content, making sure that you are always on track. It acts as a hub for the entire publishing process, keeping all the relevant files and information in one place.
It can also automate most of the process, to boot. As a default, you can send out emails to the relevant team members whenever it’s their turn to work on the piece. Or, use Zapier integrations to send out the notification on whichever team management software you use.
On top of all that, workflow software can probably keep you on top of your deadlines better than any manual system. You can set up however long each step of the process should take, and everyone becomes responsible for their own part in the publishing process.

Publishing workflow steps
Of course, the publishing steps depend on the type of media. Approval workflows appear in about 93 of our customer discussions at Tallyfy, and some publishers use designers for their media, some do not. Some even have more than one editor working on a single piece.
Depending on how your company operates, you can completely customize the process. In discussions we have had with editorial teams, we have seen document routing times drop from over a week to just 2-3 days once they moved from paper-based sequential reviews to digital simultaneous collaboration.
The following is an example of your average article publishing process. Most teams start here.
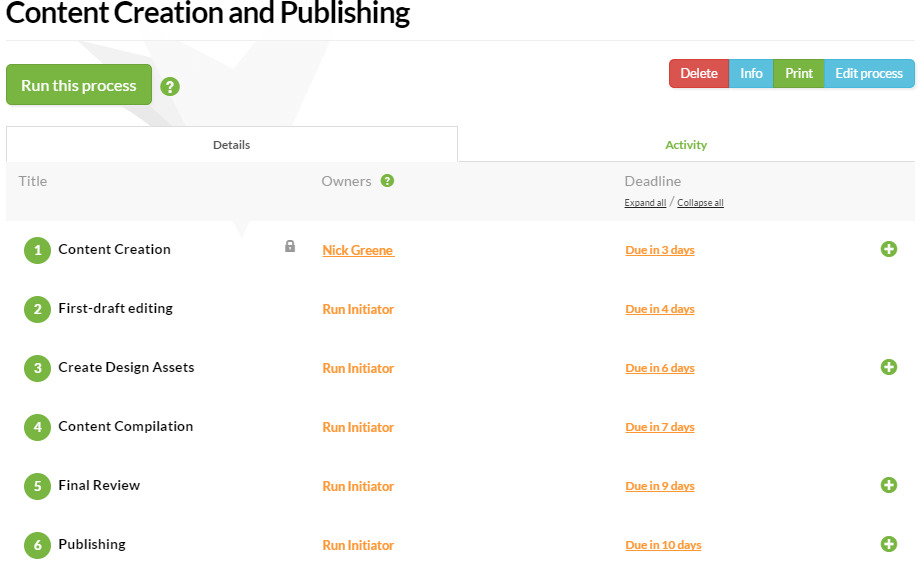
The image above is that of a general workflow. Once you create your own, depending on your preferences, you can run it as many times as you want. Once you run the process, you input its name (name of the piece of content), description and tag, kicking off the publishing workflow.

Content creation
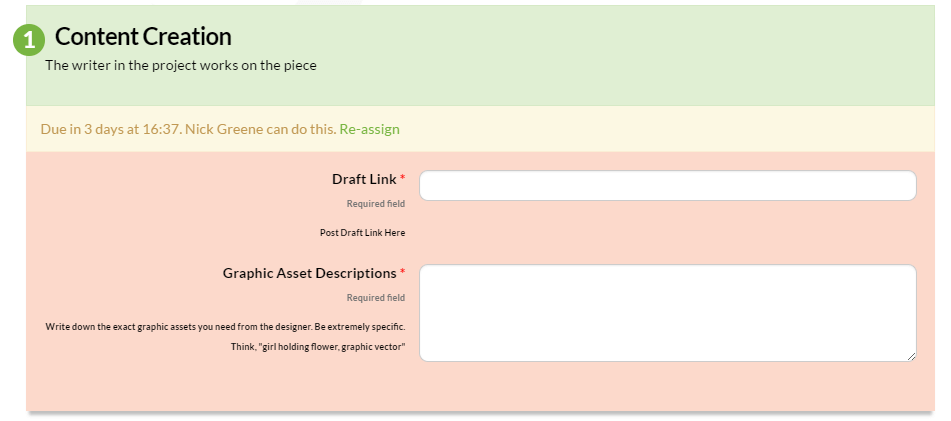
The writer assigned to the project starts writing the article. He or she puts in the link or file for the article within the “step,” and mentions any relevant illustrations that should be accompanying the article.
The graphics have to be clear, so that the designer understands what, exactly, they’re supposed to be doing. Once the writer is done, they complete the “step” and the responsibility moves on to the editor.
First-draft editing

The editor gets an email that the first draft of the article is done and that it needs to be reviewed. If it’s online, they get the link, review it, and just mark the step as complete. Or, if it’s a file, they download it, leave the comments, and upload the new document with comments or notes.
Design asset creation
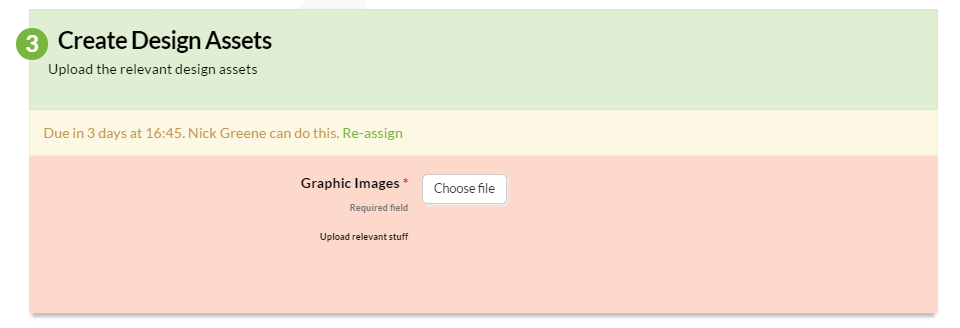
At the same time as the editor, the designer gets an email with the exact assets they are supposed to create for the article. Once the assets are done, they are uploaded to the “step,” and it goes back to the writer.
Content fixing and compilation
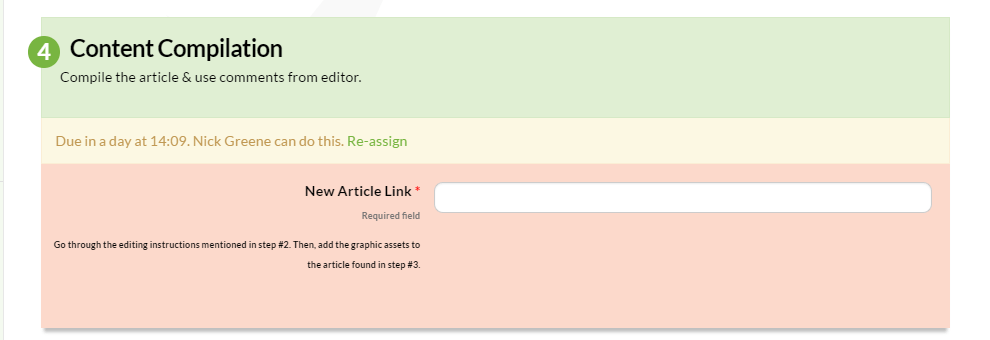
Once both the editor and the designer are done with their work, the writer is notified that he or she is supposed to finish up the article. The writer fixes the article, as per the editor instructions, adds the relevant images, and links to the article in the relevant field.
Publishing step

Finally, once finished with the article, you set it up on the CMS or Wordpress and upload it. Then, you input the link of the article on the blog to the final step, and you are good to go!
Or, you can also use workflows to deal with even more complex processes. You could create a seperate workflow to deal with the process of uploading the article, making sure all the upload guidelines are followed. You could even make a workflow to streamline your content distribution processes.
Is publishing chaos acceptable?
Are you hearing this at work? That's busywork
Enter between 1 and 150,000
Enter between 0.5 and 40
Enter between $10 and $1,000
Based on $30/hr x 4 hrs/wk
Your loss and waste is:
every week
What you are losing
Cash burned on busywork
per week in wasted wages
What you could have gained
160 extra hours could create:
per week in real and compounding value
Total cumulative impact over time (real cost + missed opportunities)
You are bleeding cash, annoying every employee and killing dreams.
It's a no-brainer
To create and manage your own publishing workflow, register for Tallyfy here. Or, here is a case study on how we have helped Opera Theater of St. Louis automate their content creation workflow.
About the Author
Amit is the CEO of Tallyfy. He is a workflow expert and specializes in process automation and the next generation of business process management in the post-flowchart age. He has decades of consulting experience in task and workflow automation, continuous improvement (all the flavors) and AI-driven workflows for small and large companies. Amit did a Computer Science degree at the University of Bath and moved from the UK to St. Louis, MO in 2014. He loves watching American robins and their nesting behaviors!
Follow Amit on his website, LinkedIn, Facebook, Reddit, X (Twitter) or YouTube.

Automate your workflows with Tallyfy
Stop chasing status updates. Track and automate your processes in one place.